Sunday, December 8, 2013

Feeding the Birds

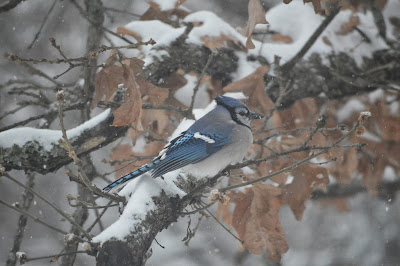
When snow covers the ground and ice coats the trees, birds have a hard time finding food. In the winter, birds do not have insects as a food source so they are dependent on seeds. They forage for seeds in the bushes and trees as well as on the ground, but ice can coat every seed and blanket the forest floor. Furthermore, more and more humans have replaces native bushes and trees with sidewalks and lawns. It has become harder and harder for birds to find food, especially during ice or snow storms.
When I hear that winter weather is on its way, I buy a bag of bird food. My son helps me fill the bird feeders. He enjoys filling them slowly, cup by cup. The scoop and pour of tiny seeds is very satisfying. Then we watch the birds from our bed first thing in the morning. My son's favorite bird is the cardinal and the summer tanager, both red birds. I get excited when we see the red bellied woodpecker.
It is important to hang bird feeders away from windows because some birds will get confused by the reflection and can fly into the glass. Sometimes it is necessary to buy reflectors and put them on nearby windows. It is important to keep predators in mind when setting up a feeder so that it is not a trap. However, some birds will prefer fallen seeds because they are ground foragers.
In the winter birds look fat. They puff up their feathers for insulation and look as if they could not eat another bite. But they are not overweight, they are just fluffing their feathers to stay warm. In the summer I stop feeding the birds. During seasons when food is plentiful, birds need to do their natural duties of spreading native seeds and keeping insects in check. However, in the winter and early spring when times are tough, I think it is important for people to feed birds. Besides it is fun and entertaining. Happy Birding!
All the pictures were taken by Lisa Parker. Thanks Lisa! 

Friday, December 6, 2013

Natural Homemade Laundry Soap

I don't buy laundry detergent anymore. I hate the way it smells (mountain breeze? really?) I don't see the need for  all the chemicals they use to make them. And the price of natural detergents is too much. Besides, making laundry soap is easy, cheap, and better for the environment than most detergents.

Ingredients:

1 c. Washing soda
1 c. Borax
1/3 of a Bar of Soap

I use Fels-Naptha soap for the dirtiest toughest clothes with stains. (These three things should be easily found in the laundry isle of your local grocery store.) But Fels-Naptha soap is not as environmentally sound as I would like. So for regular loads I use a natural, locally made soap. I buy a locally made lavender soap from Rudbud Gardens.

Mix together the washing soda and borax first. Then use a cheese grater to grate the bar soap. Mix the grated bar soap into the soda and borax mixture slowly.
If you have a larger container you can double or triple the recipe.

Use only a tablespoon or two per load.

And that is it! Simple, cheap, eco... What more could you want?

Saturday, November 30, 2013

Gratitude

My four year old woke up on Thanksgiving morning whining. At breakfast he demanded cereal. He did not say thank you.
For the most part, I have taught my son to say please and thank you. He often is very respectful. However, like his father, he is NOT a morning person!
Furthermore, four years olds are selfish by nature.
Nevertheless, on this day of giving thanks, his attitude did not go over well with me. I paced the kitchen worrying about his lack of gratitude.
"How do we teach our boy gratitude?" I asked his father.
"Hardship," he answered. "It is always the children who have nothing who are grateful."
Of course I don't wish my son to struggle through times hardship. What mother would wish hardship upon her children? I think seeing other's hardship would have a similar effect, but Zane is not old enough to volunteer in a soup kitchen with me yet.
So I took a different approach. We made a list for 20 things we are thankful for. It included my logical answers like food, family, and a home as well as his four year old "thank you to" gummy bear vitamins, rainbow colored slinky, and best friend June.
The morning after Thanksgiving we talked about gratitude with breakfast. We thanked the apple trees for fruit juice, cows for milk, the pigs for ham, and our very own hens for the eggs. Then we added to our list. Perhaps we will add a few more every morning throughout the Christmas season. I think it is a good start. Maybe you want to try this too? Share if you do!

Tuesday, November 26, 2013

Art and Parenting


The birth of a child is not only the creation ofnew life; it is also the transformation of a woman into a mother. Eventually itis also the transformation of a man into a father, however, that transformationhappens more slowly over time. A parent is someone you become. You areforever changed. In this loss of self-identity, there is morning, no matter howmuch you enjoy being a mother. Furthermore, parenting is the hardest job youwill ever encounter. It is fuller than any full-time job, more demanding thanany career, and there is more at stake than in the riskiest stunt.
As an artist, a writer, my biggest loss is that ofmy art. There is no time for a mother, especially a mother of little ones, todive head first into art and float on inspiration for a day. All I can dois grab fractions of time here and there, between snotty noses and dirtydiapers, and there is not much chance for inspiration in those fleetingmoments. When the day comes to an end and the children are asleep, I often havea little time. In my exhaustion, there is little inspiration. Every mother who wasonce a writer or a painter, a weaver or a gardener, a dancer or a musicianmisses the woman who could wait for inspiration to come and then seizethat beauty and bask in it for as long as it lasted.  
Nevertheless, you must grab all the inspiration youcan find and steal every moment you can get. Do not forget to do what you love.Never abandon your art. Your children should see you being yourself and expressingyourself. It may seem there is no time, but really there is. It will not beeasy to find, but it is there. Sure, the dishes and laundry might pile up, butyou will have to make that sacrifice. In the end you will not look back andregret neglecting your chores, and neither will your kids. On the contrary, theart you accomplish will make you happier, which will reflect positively on yourparenting and therefore on your children.
When you are swimming in dishes and laundry it is easyto forget that everything you are doing is important. But the tone of your voice,the expression on your face, and the way you go about your daily duties isteaching your children and influencing who they will become. You don't have tobe sitting on the floor playing blocks, engaging, for the art of parenting tobe taking place. Everything you do becomes art once you are parenting. Unlikeany other art, parenting never stops. The art of parenting isin everything you do and everything you are in every moment you arewith your children.  
There is an art to good parenting, but no one knowshow to do it. Like artistic beauty, good parenting is in the eye of the beholder. Noone should judge art any more than they should judge parenting methods. But nomatter the parents’ methods, the creation of an amazing human is the mostbeautiful work of art on earth. A well rounded young person with a kind heart,nimble mind, and strong body is a reward beyond the wildest artist’s dreams.
So next time you are inspired but you have no time,or you have time but not an ounce of inspiration, just remember that thoselittle ones ARE your art. Now that you are a parent, there is nothing moreimportant, no greater art!


Wednesday, July 10, 2013

All Natural Insecticide

"Insecticide." The word along makes me cringe. I am sure BlogSpot will inundate this post with adds for round-up and other chemicals that may very well kill the pests in your garden but may also poison your backyard's ecosystem. But this post is about a natural system of ridding your garden of pests... well that is a lofty dream... let's just try to cut the pest population down to a reasonable size.

First, a word of caution: this solution can cause leaves (especially tomato leaves) to burn. Do not use in direct sunlight. Apply the solution around dusk or dawn. Let it sit for 20 minutes or so. And then water your garden to wash the solution off.

Also, this solution will kill beneficial insects like ladybugs and ladybug nymphs (learn what a lady bug nymph looks like). So try do not to spray them!

The solution is simple:
Dish soap and water. Yep, that's it! (I use seventh generation or another plant based dish soap). Dish soap and water works really well on a large variety of garden pests. Just fill a spray bottle with water. Add about a tablespoon of dish soap. Shake/mix. Spray directly on insects (they like to hang out on the undersides of the leaves.) Water afterwards.

Squirting the underside of leaves can be exhausted, so I like to use a insecticide sprayer. Add a tablespoon of soap to one gallon of water. Mix. Pump to pressurize. Spray away! And then water.

So far I have successfully used it to combat aphids and squash bugs.
What insects have you found it useful on? Please comment!

Thursday, May 23, 2013

Make Your Own Miniture Hoop House

This year I found a simple, cheap, and effective way to cover my vegetables. I built temporary, miniature hoop houses.
All you need is wire, wire cutters, and old sheets or clear plastic!
I used a roll of thick old wire that had been sitting under leaves in my father's back yard. I cut my wire in big half circles (or more like 3/4 circles), their shape was already perfect for my minutes hoop house. I took the pieces of wire and poked the ends into the ground on either side of the garden bed. I could have bought clear plastic to cover the hoop houses, but instead I tried just using old bedsheets, since I had them lying around already. All season I left the hoops bridging the beds and just threw the sheets over them when there was a chance of a freeze. It was much easier than I would have thought and cost me nothing. Most importantly, it saved my little plants!

Tuesday, May 14, 2013

Stripping Cloth Diapers

This winter my son's diapers became unbarably stinky! The ammonia and bacteria build was intense! In desperation, I tried everything.
In the end, the best solution happened to be super cheap and easy:

Washing Soda -- Pour two or three tables spoons of washing soda into the load like you would powdered detergent.

Hydrogen Peroxide -- Pour two or three tablespoons of hydrogen peroxide into the bleach cup on your washer.

And Sunshine -- I would also recommend drying your diapers in the sun. The sunshine really helps bleach them white and takes out the smell.

Though this works great for regular stripping, rinse the diapers well, since the hydrogen peroxide is a little harsh for some skin. Also, I would not advise doing this as everyday washing since that hydrogen peroxide can build up and may irritate delicate skin. (This disclaimer is a new edit because I used this method of cleaning instead of soap for 6 months and my newborn son began to have a reaction to it.)


Make your own Cloth Wet Wipes

I used cloth diapers for years before I started using cloth wet wipes because I assumed cloth wipes would make cloth diapering harder. But I would wipe my baby's butt with a disposable wipe and put the dirty wipe inside the cloth diaper. When it came time to wash the diapers, I found myself pulling out the disposable wet wipes and throwing them in the trash. Turns out, this act of turning towards the trash can was more work than just throwing the wipes in the same place the diaper was headed.
Cloth diapering is challenging, but cloth wet wipes are an easy addition! It is really not any more work, it costs nothing, and it is better for the ecosystem and, therefore, our troubled world!
Here is how I do it:

Cut cotton cloth into squares with pinking sheers. I made my wipes out of old recieving blankets. They are cheap and easy to come by. But you could use an old fannel shirt. I like fannel because it is assobant and soft, but any soft cotton fabric will work. I am sure you could cut and hem the edges of your wipes, but I wouldn't bother. I mean they don't need to be pretty right? Just cut the cloth into squares with pinking sheers.

Soak them in a solution of water, baby soap, and tea tree oil. Some people put a solution in a spray bottle and wet each wipe when it is used. This way you only make the solution once. I perfect making a wet wipes batch after each wash so when I am up to my elbows in poop that wet wipe is ready! The solution I use is just warm water, a little squirt of natural baby soap, and a drop or two of tea tree oil to prevent mildew, mold, or bacteria. Just lay the cloth wipes in an old plastic wet wipe container, pour the solution over the wipes, and vuala! Wash them along with your diapers.


Tuesday, February 5, 2013

Natural Yeast Infection Remedy

    Women love to talk, but not about their yeast infections. I assume some women rarely get them. Others, more than want to admit it, battle with this annoying yet harmless ailment often. It is usually of no fault to the woman, some bodies get imbalanced easier than others. There are many things you can do to prevent reoccurring yeast infections, but it is a case of every woman needing to discover her own imbalance and her own remedy.
    I have found lots of things that help but the only natural cure I have discover is tea tree oil. Do not attempt to apply tea tree oil to your sensitive skin undiluted! It burns! Also make sure you do not have an adverse reaction to tea tree oil ahead of time on a part of your body not as sensitive.

You will need:

one tampon
an cooking oil of your choice (vegetable oil is fine but you could also use olive oil or coconut oil)
tree tree oil
small flat dish or plate with a good rim

Try doing this just before bed and wash your hands first.
1. Pour a little cooking oil into a flat dish. The oil should just barely cover the bottom of the dish. Add a few drops of tea tree oil and mix well. The size of your dish will change the exact amounts. Try only a few drops at first and see how it feels. Some women are more sensitive than others.
2. Take the tampon out of its package and out of any covering that is around it so that it is just the cotton part your leave in your vagina. Roll the naked tampon in the oil. If you have a particularly bad infection I would recommend adding a drop of tea tree oil to the end of the tampon (now that it is soaked in oil) and 2 or 3 more evenly distributed along the sides.
3. You will now need to insert the tampon with your fingers. Just push the tip inside your vagina and gently push it inside. It does not need to go all the way up, just until it is completely inside you or an inch beyond your vaginal opening. Lastly, rub a little of the left over oil from your dish around the outside of your vagina. Cover anywhere that feels like it has the yeast infection with the oil mixture. Wear light cotton underwear to bed. Leave the oiled tampon in overnight and remove it in the morning.
Though it might burn a little at first, you should feel almost instant relief. By morning, if I used the right amount of tea tree oil, my yeast infection is gone and doesn't return anytime soon. If not, or if it comes back in a day or two try the method again. You can  make the mixture with more tea tree oil if you desire. If you make it too strong, it will burn. But you will be fine.
I have used this method with breastfeeding and while pregnant. Because it is topical you should have no problems using it anytime.
Good Luck!